Tuesday, November 12, 2013

Prepping for the Flying Heritage Collection Game Day

As I briefly mentioned in my last post, NHMGS has been invited to run a game day at the Flying Heritage Collection in Everett WA on Saturday, November 16, 2013.

The Flying Heritage Collection primarily focuses on World War II combat aircraft, but it also has some armored vehicles, guns, and V-2 rocket. Be sure to check out the list of items in the collection. There is some interesting stuff there. We will be set up in the Collection’s Hanger 2 and, because of the Collection’s focus on WWII, all the games will be WW II games. Here is a brief list of the planned games (I don’t have information on specific scenarios, but that will give you a reason to show up):

 Morning Session 
- Air battle using the Check Your 6 rules
- Skirmish game using the Fire and Movement rules
- Skirmish game using the Bolt Action rules (I think this will be a Pacific action)
- Coastal forces battle using the Action Stations rules (probably barge busting in the Pacific)

Afternoon Session 
- Air battle using the Check Your 6 rules
- Flames of War battle
- Air battle using Axis and Allies Air rules and pre-painted planes

Additionally, I think that Chris Ewick will be there with his Flames of War Kursk game during both sessions.

Kevin and I will be running the coastal forces battle and I’m getting everything together for that, but no new ships are in the works. 

I’ve also been working on some troops for use with the Bolt Action rules (I might even try to get them in this weekend’s game). Just to be a little different, I decided to do a force of Australian for the Pacific. I currently have around 2 squads, some support weapons, and a tank. The figures are from Brigade Games “Diggers in the Pacific” range and the tank is Company B’s Aussie M3 Stuart. I really like the figures; I think they provide some interesting poses and they have a lot of character.

Some of you might know that I have a real problem painting troops. I’m fine with ships and planes (and even tanks), but painting people just seems to petrify me (as could be noted by all the half-finished figures for my 15mm Age of Sail games). So, painting up a bunch of 28mm figures was a big step forward for me. I did take several photos of the painting progress, but in the end I decided to just post photos of the finished product (I still need to add some flocking or grass to the figure bases).
Here come the Aussies (you can click on the image for a little larger view)
I looked around for some suggestions on how to best paint up the figures and I settled on using the ‘dip method’. I followed the instructions posted by a number of bloggers on the best way to do this and now you can see the end results.
A closer view of the Stuart tank
First squad
Second squad
A supporting Vickers MMG (you can also see the Platoon Commander figure in the front and part of the Characters A pack in back)
The supporting 3" mortar
I’ll eventually have to get some Japanese figures to go up against the Aussies, but for now I’m just happy to have completed the figures.

I will post a recap and photos from the game day sometime next week.

Sunday, October 6, 2013

Looking at Rules: Sailpower 2.0

In my search for a good set of rules of rules for my 15mm Age of Sail ships, I go in on the Sailpower 2.0 Kickstarter (you can read my impressions of the Kickstarter items in a previous blog post). I'm finally getting around to posting my thoughts on the rules (note that this review is based only on a couple solitaire games).
The Sailpower 2.0 rules comes as a 138 page printed book. However, don't be put off by the size of the book, it has lot of examples along with tables and optional rules. The basic rules aren't really that heavy and don't take up a lot of the rulebook. The rules are designed for use with 15mm (approx. 1/100) scale ships, but there is a page covering scale conversions if you want to use a larger or smaller scale. Ranges in the game are measured in inches and the game uses a D20 for all rolls (you will need a lot of them if your ship has a lot of guns). The rules are meant to cover sailing actions from the Golden Age of Piracy all the way through the Napoleonic Wars.

Before starting a game players need to fill out a log sheet for their ships. The log sheet has information about the ship's sailing speed for different wind directions, information about the ship (hull points, masts, etc.) guns, and crew. The rules provide this information for a wide variety of ships, from small gunboats all the way up to 1st Rate ships such as HMS Victory and the French Ocean class.

Turn Sequence: Each game turn has four phases: 1) Ship Movement, 2)Combat (ship-to-ship and ship-to shore), 3) Crew Actions, and 4) Record Keeping.

Ship Movement: During this phase the players check for a change in the wind direction, then plot their movement on the log sheets, and finally move their ships.

The distance ships move is determined by their initial relation to the wind at the start of the turn, but can change if the ship changes course during movement. If during movement a ship turns so that the movement rate would be lower than the starting movement rate, some movement is lost and vice-versa if the movement rate increases. The rules have a good example of this, so it shouldn't be too confusing, even for new players. Ships can make a turn (up to 45 degrees) at the start of movement, at the end of movement, and after traveling a certain distance, referred to as the Turn Delay, based on the ship stats. Ship must have a minimum number of crew allocated to sailing the ship (or rowing) and if the crew number falls below this value, the ship simply drifts.

One thing I don't think the rules cover very well is tacking (turning through the wind). The rules basically simplify this task and don't really have rules for getting stuck in irons (heading directly into the wind) other than the ship doesn't move. There also isn't any real difference in crew quality when it comes to sailing.

Combat: After movement, players can fire their guns at other ships and shore targets. First you roll a die for each gun that fires to see if it hits (this value is modified but if you roll a 10 or higher on a D20 you hit). Then, for each gun that hits, you roll for damage and mark that off on the target.

The game has 13 different gun types from rail-mounted swivel guns all the way up to fortress guns. There are also rules for mortars. Each gun type is rated for point blank range, an optimal range, and a drop distance. You get a To Hit bonus if you are within point blank range. If you are over optimal range, you get a negative To Hit modifier for each additional drop distance to the target. The drop modifier is an interesting way of handling maximum ranges, since you can always fire your gun, it just has a lower chance to hit the farther the target. There are some other modifiers too, but they are all fairly common (like ship size).

Each gun type also has a number of crew needed to man it. If the gun has half the needed crew, it can only fire every other turn. If you have less than half crew, you can't fire. Guns can be aimed at the rigging, hull, or deck (where the crew hangs out) and there are different kinds of ammunition, including bar and grapeshot.

Overall, I like the gunnery rules. There are enough different gun types and crew is an important component in firing. The only problem I can see is if you are fighting with larger ships, then you will have to roll a lot of dice.

Crew Actions: After combat, crews can fire small arms, grapple/board enemy ships, and repair their own ship. These are all fairly easy to understand actions, but the players must allocate crew to do them.

One thing I expected to see here was some sort of morale check for a ship, but the rules don't really have rules for checking morale or striking.

Record Keeping: During this phase players check on ship damages (fires, explosions, sinking ships, etc.). Then the turn starts all over again.

That covers the basic rules for the game, but in addition to those rules there are Faction Rules that add special characteristics for ships based on the crew. This is a nice addition, since I like rules that show the difference in naval crews.

There are also optional rules that cover ports (including visiting taverns and recruiting crew), forts, and treasure hunting. All of these are nice add-ons and probably will be a good selling point for gamers that want to play some pirate actions.

Overall it seems like the rules play pretty fast and should work well for a good number of ships and players. It seems like they were created for convention pirate games, so I would expect that to be the case. Although I could see things dragging a bit if there are too many large ships in a game. The sailing rules aren't the strong point for the game, but that isn't too surprising if the main focus was on convention pirate games.

The Sailpower rules are available on Amazon.com or through the Sailpower retail partner, The Soldiery, in Columbus, Ohio. You can also purchase ships and other game accessories through The Soldiery. There is a link to products on the Sailpower blog/website, which has photos of the different ship types available and information for contacting The Soldiery. The blog/website also has optional rules, FAQs, and downloads.

Pros: It should play fast, as long as there aren't too many big ships. I like the different gun types and focus on crew allocation for actions. Should be good for convention games.

Cons: I think the sailing rules could be better (it wouldn't take much to improve them) and there should be a crew morale system.

Sunday, September 22, 2013

End of Summer Wrap-Up

With summer coming to an end, it seemed like a good time to catch up on my blogging. It has been a couple months since my last post, mainly because I didn't have a lot of free time during this past summer. My wife usually keeps me busy outside with yardwork during the summer and this year was no exception, but I was also kept really busy at work. So, my hobby time was really limited this summer.

That said, I did do a few hobby related things this summer and I'll be adding posts about them over the next week. Here is a quick rundown of what to expect; I obtained three 1/700 scale Chinese Navy Type 022 missile boats, I went through the Sailpower rules, I picked up some troops for the Bolt Action rules, and read through a couple hobby-related books.

I thought I start out by posting some photos and information about the Chinese missile boats.

The Type 022 missile boat (NATO designation Houbei class) is a small (around 140 ft) catamaran armed with 8 surface-to-surface missile and a 6-barrel 30mm gun. The boats first appeared in 2004, designed as replacements for the Chinese Osa class missile boats. Original estimates were that the Chinese would build around 100 of these ships, but only 60 have been completed. This is probably due to a change in focus for the Chinese Navy to multi-role ships.

The models I've got are the 1/700 scale versions created as part of the Takara Ships of the World, series 5. There were two versions of the missile boat in the series; a standard navy grey version and a camouflaged version. When the series first came out in 2006 I wanted to get several of the boats, but I procrastinated on purchasing them. I just figured they would always be easily available. That was a mistake on my part and as time went on, the boats became more scarce on eBay and the price increased. Luckily I was able to find (and win) three boats and get them for a reasonable price (although not all at one time).
My Takara 1/700 scale Type 022 Chinese missile boats
As you can see from the photo, the ship models are pretty nice and the paint job isn't too bad. I need to mount the ships and weather them a bit, but otherwise they should work pretty well. I do need to see about changing the number on one of the camouflaged boats, just in case anyone looks real close.
A low-angle view, where you can see the numbers for the camo boats are the same
The scale seems to be pretty good and the models should fit in pretty nicely with my other ships. You can see how they look next to a Skytrex Osa missile boat.
A Skytrex Osa with the Type 022 boats


An Osa (left) and Type 022 (right) in profile

Sunday, July 14, 2013

Book Review - Intrepid Sailors: The Legacy of Preble's Boys and the Tripoli Campaign

Intrepid Sailors tells the story of the American Third Mediterranean Squadron, commanded by Commodore Edward Preble, during the war against Tripoli in 1804. The book starts off with a background on the war, the squadron, and the main historical characters that were involved in the action. The names of the Americans will be familiar to most readers, especially if you have read any other history about the U.S Navy or just looked at the names of American warships. Mainly because almost all of the young officers with the squadron (such as Stephen Decatur, Richard Somers, Charles Stewart, and James Lawrence) became heroes during the Tripoli War or went on to greater exploits later. The author does make the point that many of the men of the Third Mediterranean Squadron went on to become role models for future generations of American sailors.

After setting the scene the book goes right into action, describing the grounding and capture of the frigate USS Philadelphia, commanded by Captain William Bainbridge. Preble, on the frigate USS Constitution, did not learn about the loss of Philadelphia until almost a month after the event and almost all of the actions for the Third Mediterranean Squadron would revolve around the captured frigate and her crew. In addition to the stories of the special mission to burn the captured Philadelphia and the subsequent gunboat battles between the Americans and Tripolitans, Intrepid Sailors also covers a number of other actions that are only briefly mentioned in most other books.

The author, Chipp Reid, did a good job of using original sources and later interpretations to create an interesting narrative about Preble's squadron. There is a lot of good information on the men and ships of the squadron, along with an explanation of how difficult it is to maintain a blockade with limited resources. The book has a good mix of familiar and new information (or at least it was new to me) and I found it an enjoyable read. There were a couple places where Reid seemed to repeat himself, making me wonder if parts of the book were printed as separate articles somewhere, but overall I liked the book and would recommend it.

For gamers, the book will have a limited appeal. If you are interested in the American - Tripoli War, this book will provide a lot of new information about the ships and men involved in the war, along with ideas for scenarios. If you have an interest in small-scale naval actions during the Age of Sail, the book could give you some ideas for cutting out operations, coastal actions, and other small scale battles.

Saturday, June 22, 2013

Sailpower Ahoy!

As long time followers of this blog may remember, I've had an on-again/off-again 15mm Age of Sail project going on. I would really like to be able to do some of the Barbary Pirate actions and small gunboat actions from the War of 1812, but I've had a hard time finding rules I like along with kits and motivating myself to paint things up.

When I saw that the group that does the Sailpower rules was doing a Kickstarter project for version 2.0 of their rules and for getting some new ships, I decided to back the project. I've never played the game and I wasn't really sure the rules would be what I was looking for, but I think some of the ships they make would be worth getting (I really like the look of their armed pinnaces for gunboats).

The Kickstarter project turned out to be successful and I recently received my gear for pledging at the Captain level.

The pledge level included a Starter Rulebook, two quick reference packs (which each have 7 pages front and back and a lot of rule information, I have to admit I was expecting something a little different for the reference sheets, but this works), a Bermuda sloop kit, a flush deck sloop kit, two launches, and eight treasure chests.
Here is the whole Captain's Level reward

I will write out my thoughts on the rules in a separate post (once I've had a chance to read through them), but I thought I would show off the miniatures.  
Sailpower Bermuda Sloop kit
First up is the Bermuda sloop kit. In addition to the hull, it comes with six guns, a fighting top, a couple brackets (all made from the same resin material as the hull) and the dowels for the mast. The hull is around 7 inches long and is not as finely detailed as the Thoroughbred kits I have, but it should be fine on the gaming table once it is painted.
Sailpower Flush Deck Warship kit

Next is the Flush Deck Sloop kit. The hull is a little shorter that the Bermuda sloop, but it is wider, and comes with eight guns, a fighting top, a couple brackets and the mast dowels. As with the Bermuda sloop, there isn't a lot of detail, but it should be a good gaming piece.
Launches
One of the things that sold me on the project was the launches. You don't see too many of these for sale and I was looking forward to seeing how they turned out. Overall, they are a little rough and will need some cleaning up, but I am happy with the way they look.
A shot of the treasure chests

Finally, there are treasure chests. I think these are more for pirate games than for what I'm thinking about, but I could end up doing some pirate games and they could be handy. The chests look nice and certainly evoke a pirate feel with six of my eight chests having a skull and crossbones on top.
A closer view of the top of the chest.

Like the other items, the chests need a little cleaning up to get rid of some of the excess resin (at least I think it is resin), but they could provide some color to games.

Overall, I'm happy with what I got. I'm not sure if I will play many games with the rules, but it was a worthwhile investment.Now I just have to get back to work on my Age of Sail project. 

Friday, June 7, 2013

A Little Side Trip

At the beginning of May I attended my father-in-laws 80th birthday party and was able to make a side trip to the Castle Air Museum in Atwater California. This wasn’t my first trip to the museum, but it was the first one where my photos turned out. Now, with Enfilade out of the way, things have slowed down a little and I’m finally getting some of the photos from the visit posted here. Castle Air Museum has a really nice collection of (mostly American) WWII and Cold War aircraft. Be sure to check their website for a full list of aircraft.

While I took a bunch of pictures of the different aircraft, I thought I would focus on some of the more unusual or rare aircraft in the collection. First up, a couple of unusual WWII planes.

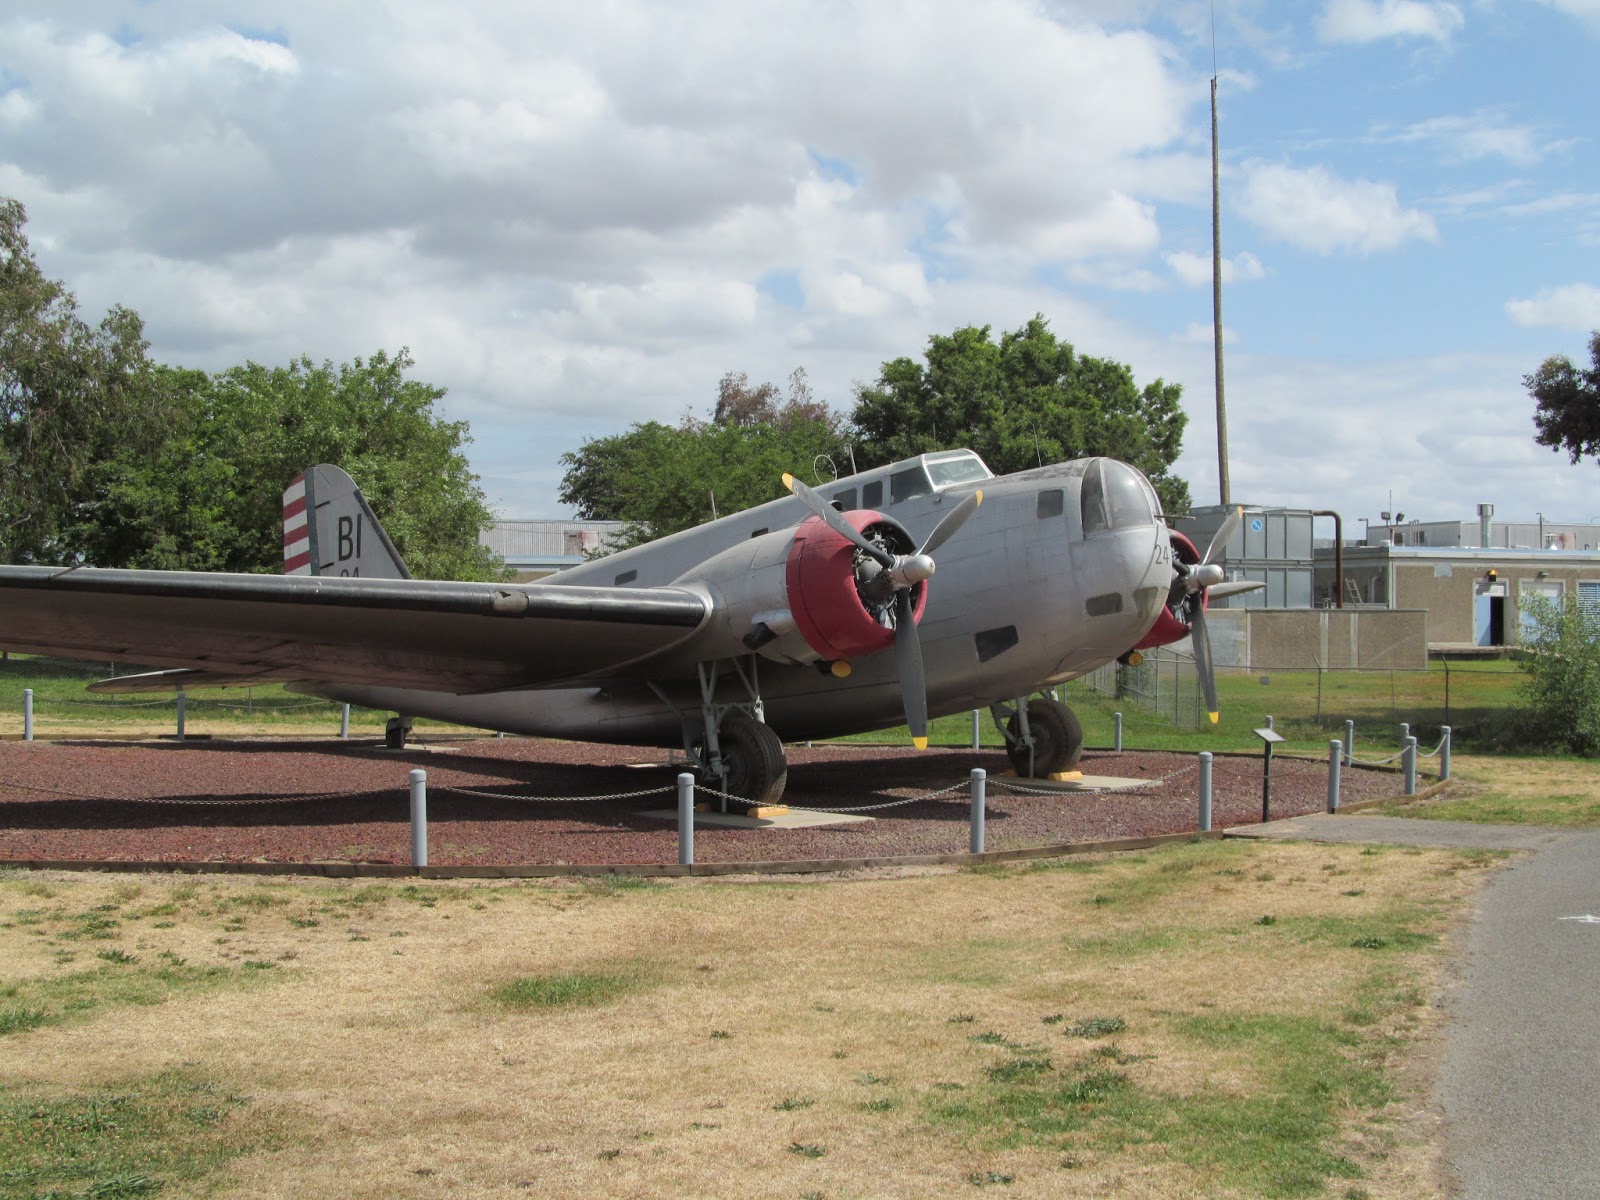
The B-18 Bolo was the plan that won the 1935 design and fly-off competition to replace the B-10, beating out the Boeing Model 299 (which would eventually become the B-17). It was the most numerous American bomber at the start of WWII, but was somewhat outdated by then. Many of the planes were eventually converted for use as anti-submarine aircraft. Only a handful of these planes are still around.
B-18 Bolo
The B-23 Dragon started out as a redesign of the B-18, but ended up as a new design. It was put into service in 1939, but wasn’t as good as the newer B-25 and B-26 bombers. It served in the patrol, training and transport role during WWII. Interestingly, even though only 38 aircraft were built, there are more restored versions of this aircraft around than the B-18 (according to Wikipedia there are only five remaining B-18s, while there are eight B-23s).
A very sleek looking B-23 Dragon
Now we move on to the Cold War aircraft with the B-50, an improved version of the B-29. The plane at the museum is a WB-50, which is the weather and reconnaissance version of the plane.
A WB-50 Superfortress
Next up is the gigantic B-36 Peacemaker (okay this is really an RB-36 reconnaissance plane). There are only four of these planes still around (probably because they are so big). There is also a mockup of the bomb carried by this type of bomber.
The RB-36 Peacemaker, with a bomb mock-up
There is also the first operational American all-jet bomber, the B-45 Tornado. In addition to being conventional and nuclear bombers, these aircraft we converted to reconnaissance planes, which were used over Korea during the Korean War. Again, another rare bird, as only three of these aircraft are still around.
A B-45 Tornado
Just in case you were thinking that Castle Air Museum is only about bombers (there are actually quite a few fighters, however there only a few unusual ones), here is an F-89 Scorpion with some mocked-up Genie missiles under the wings. I find it an interesting interceptor, mainly because it carried the nuclear-tipped Genie missile (which just seems like a crazy idea).
An F-89 Scorpion
I also took a picture of the museum’s show plane, an F-4E done up in the colors of the Air Force’s Thunderbirds flight demonstration group. While not an unusual aircraft, you usually don’t see these planes in show colors.
A F-4E in the Thunderbirds paint scheme
The last unusual plane from Castle Air Museum is an Avro Vulcan bomber. Another huge Cold War bomber, it is interesting to see this plane up close. The plane is on-loan to the museum and arrived in 1981. Some of the locals say that during the Falkland War the RAF came to the museum and took a few parts from this plane for the Vulcan bombers that participated in the Black Buck raids. The most common story is that parts of the refueling probe were taken, but I’ve never been able to confirm that story.
A Vulcan bomber
Overall, the museum is pretty nice. Most of the museum’s aircraft are parked outside and could use some cleaning up/paint. But the museum seems to be mostly a volunteer organization, so it is understandable that everything isn’t in pristine/flight line condition. If you find yourself in the central California area, it is certainly worth the time.

Tuesday, May 28, 2013

Enfilade 2013 Recap Part 2 - My Games

This year I ran two games for Enfilade, one on Saturday morning and the other on Saturday afternoon. The morning game was the 2nd Battle of St Leonard's Creek, using a modified version of Sail and Steam Navies, and the afternoon game was the Operation Tungsten raid to sink Tirpitz, using the Mustangs rules.

The 2nd Battle of St Leonard's Creek 
This game was for six players, 3 Royal Navy and 3 American Flotillamen and represented the breakout of Commodore Barney's gunboat flotilla in June 1814. The Royal Navy orders were to destroy the American gunboats if they tried to breakout; their force consisted of a 32-gun frigate (HMS Narcissus), a 18-gun brig (Jaseur), a 14-gun schooner (St. Lawrence), a set of barges armed with Congreve rockets, and a converged battalion of Royal Marines with ships' boats. The American were supposed to exit St Leonard's Creek and head north into the Pawtuxent River; their force consisted of 15 gunboats (6 with 2 guns and the others with 1 gun), along with a land-based naval battery (with two guns) and two American Army Regiments.

The Royal Navy had their ships anchored and were able to shift the initial position slightly before the start of the game. The rocket barges and ships' boats were placed adjacent to the anchored ships. After the Royal Navy was set up, the Americans placed their naval guns on the hills and set up their gunboats (they could have chosen to delay entry for all or some of the gunboats, but they decided to come in all at once). There was no wind at the start of the game, so the anchored ships would only be able to move by using their anchor points.
Royal Navy setup (You can just make out the American naval battery in the upper right)
American Gunboats ready for action
The Americans start out moving straight toward the Royal Navy ships and both sides opened fire. Initially, the only guns that were having luck hitting were from the naval battery, which hit St. Lawrence (the ship closest to shore) several times.

The rocket barges launched several volleys at the American naval battery, temporarily forcing the crew of one gun to run away, and at the approaching gun boats, but did not cause any major damage.
Congreve rockets fly past the American gunboats as they approach the anchored Royal Navy ships
The Royal Navy also decided that the Marines in the ships' boats would be best used to try and catch and capture the American gunboats (rather than sending them ashore to attack the American Army and naval battery). This created an interesting situation with each side's smaller ships trying to close with the enemy's bigger ships.

As the gunboats approached, the St. Lawrence's Captain chose to cut his anchor cables and try to drift downriver to avoid the American guns. But the American gunboats were able to catch the drifting schooner and tried to grapple with and board the drifting ship.
The Americans try to board St. Lawrence
As the range closed, long gun and carronade fire began to hit. The Narcissus and Jaseur took some light damage, but their guns were starting to heavily damage and sink the American gunboats. The Americans were always planning on making a run for it, but they were hoping to inflict some heavy damage on the Royal Navy before being forced to break off. But with several gunboats sunk or sinking, they decided it was time to head north.
The Americans start heading up the river
The battle for the schooner St. Lawrence went back and forth. The Americans struggled to get all their gunboats into the boarding action, while a timely reinforcement by a group of Royal Marines helped hold off the Americans.

As time for the game period was running out, we decided to wrap up the game. It looked like the Americans would be able to get five to eight gunboats off the board (depending on how luck the Royal Navy with long range cannon fire), while for the Royal Navy the schooner had heavy damage, the frigate and brig had light damage and they lost a few groups of ships' boats and Marines. All things considered, we decided to give the Royal Navy a marginal victory.

The game went pretty well (although it seemed to take longer than I expected). If I ever run this again, I will probably change the Royal Navy setup to allow them more freedom with their initial positioning.

Hunting the Beast (Operation Tungsten) 
After finishing up the morning game, I quickly shifted the table around for the Tirpitz game. For this game we had eight players, 2 German and 6 Fleet Air Arm (FAA). Kevin and I handed out the briefing for each side and started talking about their choices for the game.

The Germans planned to have two FW-190s and two Me-109Gs over the Tirpitz anchorage. They also selected to add a destroyer to help with flak and to let their light flak fire at long range (they could have chosen to rein in the light flak by limiting the range it would fire at).

The FAA selected to launch a morning raid and for their raid they chose 6 Barracuda bombers, three Corsair fighters, two Hellcat fighters, and one Firefly for flak suppression (the FAA was limited to 12 aircraft). Once the forces were selected everyone setup and the FAA players made their navigation roll, which they passed without any problems.
The FAA raid enters the board with the German fighters in the center of the board
The FAA chose to take the short route to the battleship, which forced them to bunch up their bombers a bit. The Luftwaffe initially was at high altitude near the battleship and the FW-190s had to make a hard turn to get into action. The Me-109s got off a couple shots at the high-level escorting Corsairs, but only did minor damage to one.
FAA closes with the battleship
The FW-190s ended up tangling with the Hellcats, with each side losing one plane. The remaining FW-190 continued to turn to go after the bombers, while a Corsair tried to get behind the German fighter. The FW-190 did get off a long-range shot at a Barracuda, it only caused minor damage. The Corsair finally caught the FW-190 and bad rolls by the German player would cause the fighter to go down in flames.

The Germans started aiming their heavy flak, while the FAA Firefly moved to suppress some of the flak. However the most effective flak suppression turned out to come from the German players, as they couldn't roll high enough to do any real damage to the FAA planes.
Barracudas moving through heavy flak
The FAA bombers were able to move into attack position ...
Bombers over the target
and make their attack with devastating results.
Tirpitz goes boom
The FAA came away with three critical hits and three other hits, which was more than enough to put the Tirpitz on the bottom of the fjord for an decisive FAA win. This game moved very quickly and everyone seemed to enjoy it. After the game I handed out some prizes, provided by Fights On. Thanks to the crew from Fight's On for supporting my game and providing the flak emplacements and prizes.

I think both games went pretty well. The Tungsten game had more spectators and you should be able to see some photos from the game elsewhere.