With the fleets done, the rules printed, and everything in place; I was ready for DANG day to arrive.
Everyone began arriving at my place around 9:30 AM and we spent the next hour saying hi, catching up on things, talking about the projects we are all working on and planning, along with various movie and book reviews (which also continued throughout the day).
After a short review of all the rules (we used David Manley's Christian Fire and Turkish Fury rules for the tactical game and my own home brew operational rules), we split up sides for the game, with Scott, Dale, Mark and George playing the Holy League and Paul, David S., Kevin, and Dave C. playing the Ottomans. Each side then took some time to review the positions of their squadrons and select the Fleet Leaders for their side. I had provided each side with a list of leaders from which they had to select 3 Fleet Leaders. The overall commander for each side was already set with the historical figure, Don Juan de Austria for the Holy League and Ali Pasha for the Ottomans. Each leader had a Leadership Rating, used to determine what the leadership would be for the tactical battle, and a short description meant to give the players an idea if there would be any special rules associated with the leader (some leaders had restrictions on what squadrons they could attach to, or special combat bonuses).
 |
| Campaign Game Operational Map with Fleet Markers |
We were now ready to start the operational moves. I created a short set of rules for operational movement to provide some variety before getting to the main fleet battle and to provide each side with a chance to earn some extra victory points for raiding the enemy coast. Each side's squadrons were a bit spread out at the start and no one knew exactly where the opposing squadrons were.
 |
| The Holy League making an operational move. |
My expectation was that both sides would try to consolidate their forces as quickly as possible and then run a few raids before attacking the main enemy fleet, and that was pretty much what happened.
 |
| The Ottoman Fleet moving into place. |
The Holy League pulled all but one squadron of their fleet together and conducted a successful raid near Lepanto. Buoyed by their success, they decided to try another raid in the same area, while the Ottomans attempted the same thing on the Venetian colonies on Crete. This time Holy League raid was beaten back, with minimal loses, while the Ottoman raid was repulsed and the boarding ratings for their ships were reduced. Not wanting to fight with reduced boarding, the Ottomans retired back toward Greece to embark fresh troops. The results of these raids caused each side to be a little more wary about conducting raids and instead they decided to move their fleets into a naval action.
In our version, rather than meeting at Lepanto, the fleets ended up finding each other off the southern end of Greece, in what I will call the Battle of Cape Matapan (I know that is the WWII battle, but based on the location on the operational map, it seems like a good name for this action). I laid out some islands to set the battlefield (I created a bit of a choke point, which sort of channeled the battle and may not have been the best choice) and each side set up. The Holy League lost the initiative roll and had to deploy first.
 |
| The Holy League decides how to deploy their forces. |
A random roll at the start of the battle forced one Holy League wing to be set up in Line Astern formation, but this didn't really hurt them in the end. Rather than dividing up their Galleasses, the League put them all with the center, essentially forming a waterborne grand battery.
 |
| Holy League initial deployment with the Left Wing (bottom), Center (with the Galleasses), and Right Wing (top) |
The Ottomans put their biggest squadrons in the center, with the Galliots and a galley squadron on the left (they chose to set up in Line Astern formation). The Fustas were placed with the Barbary squadron (the Ottomans only Elite squadron) in the rearguard.
 |
| Ottoman initial deployment, Left Wing in line astern, Center, Rearguard, and Right Wing |
 |
| The initial positions viewed from the Holy League side. Note the islands on the left that restricted maneuvering. |
With both sides set up, we were ready to begin moving.
 |
| The Ottoman Fleet on the move (we made Dave C. point at the ships for the photo). |
Initial movement on both sides was hampered by some poor leadership rolls, so there was slow progress to get to contact.
 |
| The Fleets close with each other. |
 |
| The Holy League on the move. |
But the Ottoman left, commanded by Hassan, son of Barbarossa pressed ahead of the other Ottomans (the special rule associated with Hassan said that he had to always move at maximum speed toward the nearest Christian squadron).
 |
| The Ottoman Left Wing closes with the Christians. |
This led to the first exchange of cannon fire.
 |
| Initial long-range cannon volley against the charging Ottomans. |
Followed by the first melee combat.
 |
| Working out the first melee combat rolls. |
With the melee raging on his right, the Holy League Center moved up to support the Right wing.
 |
| Holy League Center moves up. |
While the Ottoman Center also moved to attack.
 |
| Ottoman Center moves into position. |
The initial fire from the Galleasses sank several Ottoman ships and disordered the 2 squadrons, bringing them to a stop. One squadron was able to reform and attack the Christian line while the Rearguard moved to bypass the stalled squadron and get into action.
 |
| Ottoman Rearguard moves to join the fray. |
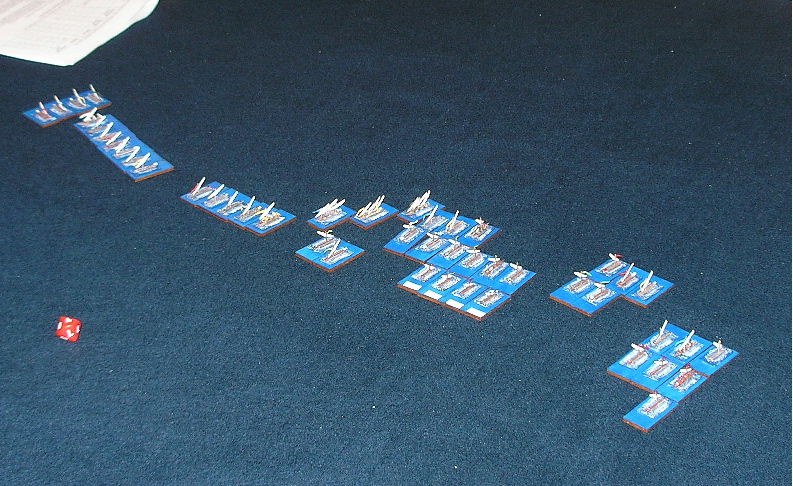
The Ottomans had engaged in melee on their Left and Center, while the right still lagged behind. One of the Center squadrons remained stalled and continued to be whittled down by long-range cannon fire from the Galleasses.
 |
| The Battle Joined |
However, the dice turned against the Ottomans as the Left wing collapsed with the loss of all ships and the engaged Center squadron was also wiped out. On the bright side for the Ottomans, the Barbary squadron in the Rearguard destroyed a Holy League squadron and the Right wing was doing well against the Holy League Left wing.
 |
| The Holy League Right Wing advances destroying the Ottoman Left Wing. |
The Rearguard continued to press forward, destroying another Holy League squadron and a disordered Galleasses. The Right Wing seemed to slowly be winning the battle of attrition, but the outcome was still in question.
 |
| Ottoman Rearguard and Right Wing push ahead. |
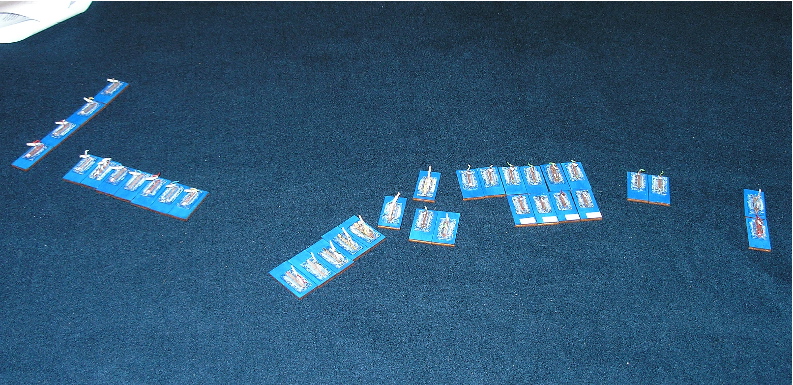
As the Holy League Right wing and remaining squadrons from the Center turned to engage the Ottoman Rearguard, the Ottoman Right wing finished off the Holy league Left wing in what can only be described as a Pyrrhic Victory.
At this point, with essentially half the players knocked out of the battle, we decided to call the game. Each side had lost one wing (Ottoman Left and Holy League Right). The Holy League Right wing was basically intact, while the Center still had one good squadron and two Galleasses. On the Ottoman side, the Rearguard was intact, there was one severely depleted (and disordered) squadron from the Center and a severely depleted squadron from the Right wing.
 |
| Final positions of the battle: On the left the Holy League Right Wing and Center are turning toward the remaining Ottomans. On the right, the remaining Ottomans plan their escape. |
We decided to call it a victory for the Holy League, but not as decisive as the historical battle. We expected that events in the Mediterranean would continue along their historical course, while the Barbary squadron from the Rearguard would return home and continue to plague Western shipping for the next couple hundred years.
Overall, I think everyone had a good time and enjoyed the game. We all thought that the Christian Fire and Turkish Fury rules did a good job of portraying squadron level action for the era (the only minor quibble being that people thought the melee combat table would work better rolling 2D6 instead of a D10). We all agreed that we should try to find a copy of the “Greek Fire and Roman Fury” rules that these rules were based on to be able to try out some pre-gunfire galley warfare.
I was pretty pleased with how things turned out for DANG 2010. It is always a lot of work to put together and I often end up with extra food and beer (although that really isn't a problem) after the event, but the games usually turn out to be a whole lot of fun, making it worth all the work.
There were a lot of other photos taken during the game and I'll post links to the other blogs and photo sites when the other participants get them up.
Thanks to everyone for showing up for the game.
 |
| 2010 DANG participants: Mark, Dave C., David S. Kevin, Scott, Dale, George, me, and Paul. |


Hi Dave, looks like you all had a great time, and good to hear that the rules worked well for you. The comment about the 2D6 rather than a d10 for combat is interesting, I'll give it some thought. Any other feedback on how they went? re the ancient set - I'll see if I can dig out a copy for you :)
ReplyDeleteGood job Dave, and congrats to the Holy League!
ReplyDeleteDave, it was a really enjoyable game. To David: As a fan of F and F, I thought the adaptation to this period worked very well. Would love to try the ancient rules.
ReplyDeleteTo Kevin - Dave has a copy of them now :)
ReplyDeleteThanks for the commnets. It was a fun game to run.
ReplyDeleteDavid, I don't really recall any other comments about the rules. Hopefully we will get a chance to try out the other rules that you have sent.
Dave S.
Dave:
ReplyDeleteWow, very nice looking, and nicely run game. The scale looks great too. Dean
Dean,
ReplyDeleteKevin was trying to talk me into running it at Enfilade during one of the longer Friday game periods. I will have to see what else is going on, but I've got it down as a possibility.
Any idea where I could obtain a copy of Christian Fire and Turkish Fury? Any assistance would be appreciated.
ReplyDeleteThanks!
Neil ( bofoisme@yahoo.com )